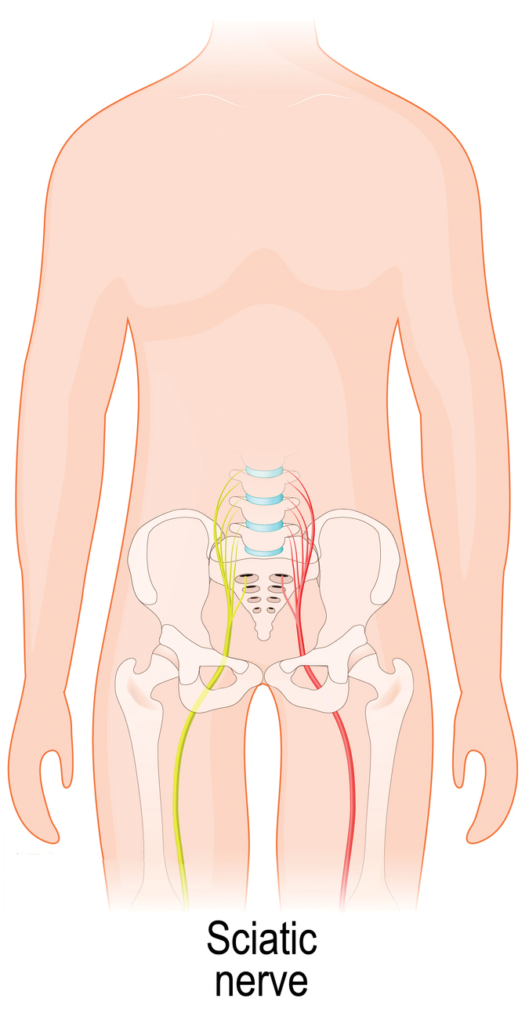
 The sciatic nerve is a pair of nerves that originates in the lower back and extends deep through the buttocks and thighs down along the side of the legs to the heels of the feet, one nerve on each side of the body. The sciatic nerve is the largest nerve in the human body and is responsible for a significant portion the nervous functioning in the thighs, legs, and feet.
The term sciatica refers to a condition in which one of the sciatic nerves becomes irritated or compressed, resulting in pain deep in the buttocks that radiates down one of the legs (usually just one side of the body is involved), often accompanied by a prickling or tingling sensation in the skin around the lumbosacral joint of the spine (lower portion of the back), depending on where the sciatic nerve is being irritated/compressed. Some people may experience weakness and changes in reflexes.
Common causes of sciatica are related to the spine itself (e.g., herniated disk, bone spur, narrowing of the spine [stenosis]) in which compression of the nerve occurs. Less common non-spine-related causes include tight, overused, or injured muscle (e.g., piriformis syndrome); trauma; postoperative complications; gynecologic conditions; and herpes zoster. However, sitting for long periods of time, being inactive in general, being overweight or obese, and even wearing overly tight pants can all put pressure on the sciatic nerve and exacerbate existing sciatica or cause sciatic pain.
Sciatica is usually treated conservatively with a few days of rest, medication for pain, and some physical therapy, though surgery might be required if there is significant stenosis or evidence of irritation of the nerve.[1–3]
Yoga has been shown to be an effective treatment for lower back pain. A 2016 meta- analysis of published literature evaluated the effectiveness of yoga as a treatment for chronic lower back pain, including how yoga impacts physical functioning and disability, pain, and associated psychological symptoms. Based on their analysis of the literature, the authors of this meta-analysis reported, “With few exceptions, previous studies and the recent randomized control trials (RCTs) indicate that yoga can reduce pain and disability [associated with lower back pain], can be practiced safely, and is well received by participants. ”[4] But what about yoga for sciatica? Though an internet search revealed many articles from a variety of websites describing the benefits of yoga for treating sciatica, a search of the National Library of Medicine’s PubMed database (a well-respected index of international biomedical literature) did not pull up many studies specifically evaluating the effectiveness of yoga as a treatment for sciatica. However, a few small studies demonstrating the benefits of yoga in people with sciatica have been published. In a 2015 randomized, controlled trial,[5] 61 adults with nonspecific lower back pain (nsLBP) or sciatica, with disc extrusions or bulges, were treated with either a specially designed, three-month yoga course or standard medical treatment. Results showed greater improvements in disability measures in the yoga group compared to the standard medical care group, with no reported adverse effects. And in a small 2013 study,[6] researchers reported that yoga poses such as the cobra and locust improved symptoms of sciatica in their study participants.
Here, we present a collection of yoga poses that stretch and strengthen the lower back, buttocks, and backs of thighs, and promote flexibility, which may reduce symptoms of sciatica.[7,8] Practice the poses slowly and carefully, modifying the movements if necessary. If a pose hurts outside of gentle stretching, don’t keep doing it. And, as always, consult your doctor if you are unsure whether yoga is appropriate for you or if your sciatic pain worsens, lasts more than a month, or is accompanied by other unusual symptoms.
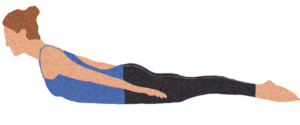
 Cobra Pose
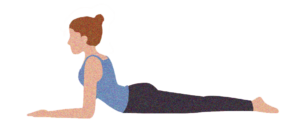 Cobra Pose
Strengthens the spine; stretches chest and lungs, shoulders, and abdomen; soothes sciatica
- Lie on your stomach on the floor with your legs stretch back and the tops of your feet on the floor. Place your hands palm down on the floor with elbows under elbows and close to your body.
- While pressing the tops of the feet and thighs into the floor, inhale while slowly straightening your arms, lifting your chest off the floor. Keep your thighs, pubis, and tops of feet pressed firmly into the floor, slightly squeezing the buttocks.
- Lift your ribs slightly while pressing your shoulder blades back. Try to distribute the backbend along the entire spine. Hold the pose for 15 to 30 seconds, breathing easily.
- Exhale as you relax back down to the floor.
 Lotus Pose
 Lotus Pose
Strengthens the muscles of the spine, buttocks, and backs of the arms and legs; stretches the shoulders, chest, belly, and thighs
1. Lie on your stomach on the floor with your arms stretched back and resting along the sides of your body, with your hands palms up. Rest your forehead on the floor and turn your big toes in toward each other.
2. While exhaling, lift your head, upper torso, arms, and legs away from the floor so that your body is resting on your lower ribs, belly, and front pelvis. Tighten the muscles in your buttocks while reaching strongly through your legs. Keep the big toes turned toward each other.
3. Raise your arms parallel to the floor but still reaching back along your body’s sides.
4. You can either look forward or raise your head slightly to look up, but don’t bend the neck too much. You want to keep your neck long and in line with your spine. Hold the pose for 30 to 60 seconds
5. Release the pose as you exhale. Repeat 1 or 2 times if possible.
 Child’s Pose
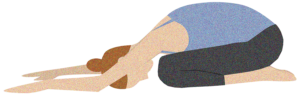 Child’s Pose
Lengthens and stretches the spine, improves flexibility and opens your hips, thighs, and lower back
1. Starting on your hands and knees, bring your knees together and sink your buttocks down onto your heels, tops of feet resting on the floor. Fold your body forward, resting your torso on your thighs.
2. Extend your arms out in front of you palms down or allow them to rest back alongside your body, palms up.
3. Focus on breathing deeply and slowly as you relax your torso and release any areas of tightness. Hold this pose for up to 5 minutes.
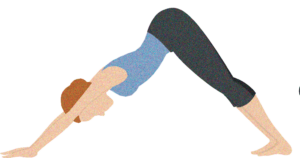
Downward Dog Pose
Aligns the body and relieves pain and tightness
1. Starting on your hands and knees, raise your hips/buttocks up toward the ceiling while straightening your legs and arms and pressing your hands down into the ground.
2. Let your head drop down, relaxing your neck. 3. Move your body through any variations that feel appropriate (e.g., bend knees slightly
and tilt your pelvis up or bend one knee slightly, then the other, feeling a more intense stretch along the backs of the legs)
4. Hold this pose for up to 1 minute.
 Low Lunge
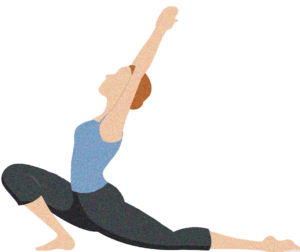 Low Lunge
Stretches the thighs and groins and opens the chest
1. From Downward Dog, exhale and step your right foot forward between your hands, aligning the right knee over the heel. Lower your left knee to the floor and, keeping the right knee fixed in place, slide the left knee back until you feel a comfortable stretch in the left front thigh and groin. Turn the top of your left foot to the floor.
2. Inhale while lifting your torso upright and sweeping your arms out to the sides and up so that they are perpendicular to the floor. Draw the tailbone down toward the floor and lift your pubic bone toward your navel. Lift your chest.
- Slowly move your head back slightly while you look up, reaching the tips of your fingers to the ceiling. Hold for 1 minute.
- While exhaling, lower your torso back down to the right thigh and your hands to the floor, turning your back toes under. Breathe in, and with another exhale, lift your left knee off the floor and step back to Downward Dog. Repeat with the left foot forward for the same length of time.
 Eagle pose
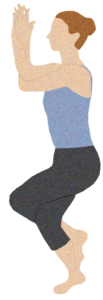 Eagle pose
Stretches thighs and shoulders, strengthens core, improves balance
- Stand with feet together and arms to the sides. Bend your knees slightly, lift your left foot up and, balancing on your right foot, cross your left thigh over the right. Point your left toes toward the floor, press the foot back, and hook the top of the foot behind the lower right calf. Balance on the right foot.
- Stretch your arms straight forward, parallel
to the floor, then cross the arms in front of your torso so that the right arm is above the left, then bend your elbows, placing the right elbow into the crook of the left, and raise the forearms perpendicular to the floor. The backs of your hands should be facing each other. - Press the right hand to the right and the left hand to the left, so that the palms are now facing each other. Pressing the palms together as much as you can, lift your elbows up, and stretch the fingers toward the ceiling.
- Hold the pose for 15 to 30 seconds, then unwind the legs and arms and stand tall and straight. Repeat for the same length of time with the arms and legs reversed.
 Marichi’s Pose
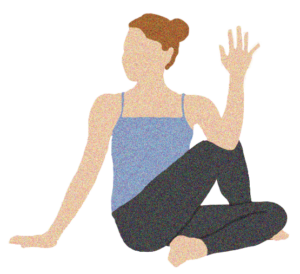 Marichi’s Pose
Increases flexibility in the back, shoulders and hamstrings
1. Sit with your bottom on the floor, legs straight out in front of you, and torso tall and straight. Bend your right knee, and, keeping the right foot on the floor, bring the heel as close to the right sitting bone as possible. Keep the left leg rotated slightly inward. Press the back of the left heel and the base of the big toe away from the pelvis. Press the inner right foot actively into the floor
2. While exhaling, rotate your torso to the right and wrap your left arm around the right thigh. Hold the outer thigh with your left elbow with left hand raised up, and press your right fingertips into the floor just behind your pelvis to lift the torso slightly up and forward, feeling the stretch in your right hip and buttock, lower back, and shoulder.
3. Continue lengthening the spine with each inhalation, and twist a little more with each exhalation. Hug the thigh to your belly using your elbow and gently turn your head to the right to complete the twist in your cervical spine.
4. Stay in the pose for 30 seconds to 1 minute. Then release with an exhalation, reverse the legs and twist to the left for an equal length of time.
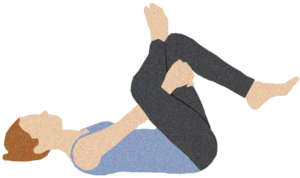
Reclining Pigeon’s Pose
Stretches your glutes, hips, and piriformis muscle
1. Lie on your back with both knees bent. Keeping the left foot on the ground, lift and place the right ankle on top of the lower left thigh. Stay here if you already feel a deep stretch.
2. To go deeper, lift your left foot, grasp both hands around left knee, and slowly draw your left knee in toward your chest, deepening the stretch in the right glute, hip, and piriformis muscle. Hold for up to 1 minute.
3. Repeat on the opposite side.
Sources
1. Mayo Clinic site. Sciatica. https://www.mayoclinic.org/ diseases-conditions/sciatica/symptoms-causes/syc- 20377435. Accessed 31 Oct 2020
2. Giuffre BA, Jeanmonod R. Anatomy: sciatic nerve. Last Update: 31 Jul 2020. StatPearls [Internet]. Treasure Island (FL): StatPearls Publishing; 2020 Jan. https://www.ncbi.nlm.nih. gov/books/NBK482431/. Accessed 31 Oct 2020.
3. Wells B. Five surprising ways you might be worsening your sciatica. 22 Nov 2019. US Pain Foundation site. https:// uspainfoundation.org/blog/five-surprising-ways-you-might- be-worsening-your-sciatica/#:~:text=Sitting%20too%20 much%20can%20also,to%20flow%20to%20the%20area. 31 Oct 2020.
4. Chang DG, Holt JA, Sklar M, Groessl EJ. Yoga as a treatment for chronic low back pain: A systematic review of the literature. J Orthop Rheumatol. 2016 Jan 1; 3(1): 1–8.
5. Monro R, Bhardwaj AK, Gupta RK, ert al. Disc extrusions and bulges in nonspecific low back pain and sciatica: Exploratory randomised controlled trial comparing yoga therapy and normal medical treatment. J Back Musculoskelet Rehabil. 2015;28(2):383-92.
6. Singh AK, Singh OP. A preliminary clinical evaluation of external snehan and asanas in the patients of sciatica. Int J Yoga 2013 Jan;6(1):71-75.
7. Conkleton E. 10 yoga poses for sciatica pain relief. 24 Jul 2019. https://www.healthline.com/health/yoga-for- sciatica#reclined-pigeon-pose. Accessed 31 Oct 2020.
8. The Yoga Journal site. Yoga poses. https://www.yogajournal. com/poses.AccessedOct312020.